
By Parker Hannifin and MCE’s Fluid Power Teams

Transair Pressurized System Outlet
Hot tapping, or pressure tapping, is the process of adding a new connection to a piping system while under pressure. All media require their own procedures, but hot tapping is commonly used for water, natural gas, petroleum, and compressed air piping systems. This method is ideal for scenarios when turning off and depressurizing the system will cause significant downtime or disruption to service.
For Transair aluminum compressed air systems, Parker Transair has developed a specialized drop bracket and drill attachment for hot tapping. These components and procedures are only rated for use on compressed air flowing through Transair aluminum piping. These brackets should never be used on other media or piping materials at risk of personal injury or death.
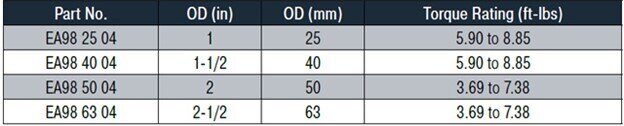
Transair pressurized system (hot tap) brackets feature the same screw closure method as found on Transair drop brackets to securely attach the bracket to the aluminum pipe. To control compressed air flow after installation, the bracket has a ball valve with 1/2” BSPP female threads. Parker Transair offers hot tapping brackets for 1, 1-1/2, 2, and 2-1/2 inch diameter aluminum piping. The required drilling tool can be used with any standard battery or corded drill.
Looking for assistance installing your Transair system?
Contact our Team to Get Started
Key steps when installing a hot tap bracket
Follow these steps when installing a hot tap bracket on a pressurized section of Transair aluminum piping. Please remember that compressed air can be very dangerous when not properly respected. Always wear proper personal protection equipment (PPE) and follow all installation procedures when installing a hot tap bracket.
1. Attach the bracket to the pipe
Position the clamp with the ball valve pointing in the direction of the new connection. Keep in mind this bracket cannot be removed without depressurizing and replacing the section of pipe. Ensure you have the location identified correctly. Finally, close the clamp and secure the bolt using a 5mm allen wrench. DO NOT exceed the recommended torque rating when tightening the bracket screw.
2. Thread drilling tool onto the ball valve
Thread the drilling tool (EA98 06 00) onto the ball valve. Next, attach the drilling tool to the chuck of a power drill.
3. Drill the hole
Slowly turn on the drill and start drilling into the pipe. Once the drill enters the pressurized pipe, the force of the compressed air will retract the drill bit into the drilling tool.
4. Close the valve
The drilling tool will not disconnect while under pressure. The ball valve needs to be closed to shut off the flow of compressed air.
5. Remove the drilling tool and debris
After removing the drilling tool and debris, the pressurized system bracket is ready for use.
Featured install video

Watch our install video for how to hot tap a pressurized section of Transair aluminum piping.
To learn more about Parker's pressurized system brackets, please visit Parker's website.
Looking for help installing your Transair system?